| In this article I will demonstrate how to use globalization to create multilingual web application. This article is written to target beginner level audience. | |
| As the requirement of software is increasing issues are also emerging, one of the issue is to customize the application for different region. This type of customization requires lot of donkey work to be done. So that labels text, date time format, and currency format and other things which are dependent on regions can be changed. | |
| Microsoft .Net has provided a mechanism known as Globalization to handle this type of issues so that minimal amount of change is required. With .Net it is now very easy to develop multilingual web application. When we talk about globalization another terms comes in our mind which is localization, so first let us make a clear picture about these terms. | |
| Globalization: Is about making the application for global use so that it can be used in different region of the world. | |
| Localization: The term localization refers to process of creating the content of application according to some specific region. | |
| Now we can say that in-order to achieve globalization we need to do localization, because until and unless we create localized contents for different regions we cant globalized our application. | |
| In this example I change the culture of the application on the fly by passing agreement to the page via query string. So let’s start by creating a web Application. | |
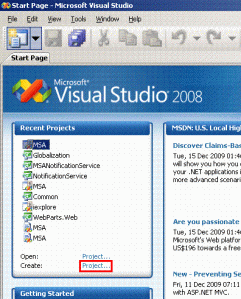
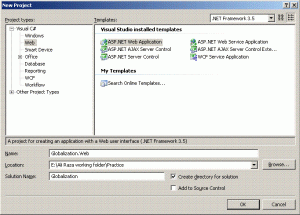
| 1. Open Visual Studio and click on Project in front of Create. | |
 | |
| 2. Select Web under the node of Visual C# in Project types box and then select ASP.Net Web Application in the Templates box. | |
| 3. Fill the Name and Solution Name text boxes with project name and solution name respectively and click OK.New project will be created containing Default.aspx page leave it as it is for future use. | |
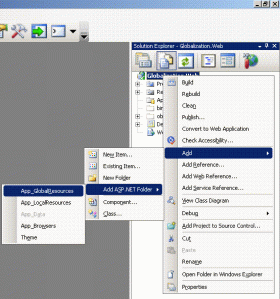
| 4. Right click in the GlobalResource.Web -->Add-->Add ASP.Net Folder-->App_GlobalResources.A folder with the name App_Globalresources will be created. | |
 | |
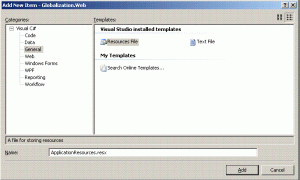
| 5. Right click on the App_GlobalResources-->Add-->New Item…, Add New Item window will be opened. | |
| 6. Click on General under the node of Visual C# in Categories box and select Resources File from the Templates box beside it, Enter the ApplicationResources.resx in the Name field. | |
 | |
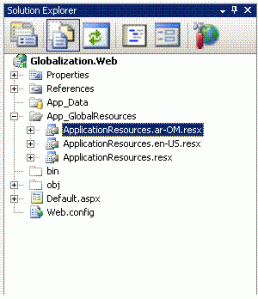
| 7. Add two more resource files with the name ApplicationResources.ar-OM.resx and ApplicationResources.en-US.resx. | |
| 8. Now the Solution Explorer will somehow look like this. | |
 | |
| 9. Put the following xml at bottom of ApplicationResources.ar-OM.resx file. | |
| <data name="HelloWorld" xml:space="preserve"><value>مرحبا العالمي</value> </data> <data name="SelectLanguage" xml:space="preserve"> <value>اختر اللغة</value> </data> | |
| Add following xml in ApplicationResources.resx and ApplicationResources.en-US.resx file. | |
| <data name="HelloWorld" xml:space="preserve"><value>Hello World</value> </data> <data name="SelectLanguage" xml:space="preserve"> <value>Select Language</value> </data> | |
| 10. To make this article as simple as possible It will only add one two Labels, and one DropDownList control. Following is the html of aspx file. | |
| |
| In the above written HTML "<%$ Resources:TestSiteResources, SelectLanguage %>" is used for accessing resource file entries from HTML. | |
| 11. Add following code in CS file of the page. | |
| using System;using System.Globalization; using System.Threading; namespace Globalization.Web { public partial class _Default : System.Web.UI.Page { protected override void OnInit(EventArgs e) { base.OnInit(e); } protected override void InitializeCulture() { base.InitializeCulture(); if (Request.QueryString["LangId"] != null) { if (Request.QueryString["LangId"] == "0") { Thread.CurrentThread.CurrentUICulture = new CultureInfo("en-US"); } else if (Request.QueryString["LangId"] == "1") { Thread.CurrentThread.CurrentUICulture = new CultureInfo("ar-OM"); } } } protected void ddlSelectLanguage_SelectedIndexChanged(object sender, EventArgs e) { Response.Redirect("Default.aspx?LangId=" + ddlSelectLanguage.SelectedValue); } } } | |
| 12. In the above written C# code In order to change Culture Information I have overridden InitializeCulture() method and change the culture information of the page. I this method I only change the CurrentUICulture because the impact of my change is only related to UI. If I were need to change the currency, date, time then I also need to change CurrentCulture as well.I also have implemented the SelectedIndexChanged event of the DropDownList control to reload the page and passing selected language identifier in the query string. | |
| That’s what all you need to do. Now compile and run the application. Have a nice day :). |
Friday, September 3, 2010
ASP.NET: CREATING MULTILINGUAL WEB SITE
Subscribe to:
Post Comments (Atom)
This comment has been removed by a blog administrator.
ReplyDelete