Sunday, September 23, 2012

How to Put/Create Space in HTML

Hello Everyone,
                         Putting Space in HTML is quite simple, All you need is to put   tag between your text.

So for instance you have a label and a TextBox in your Page, and you need to separate them by giving space between them

    <asp:Label ID="Label1" Text="This is a Label" runat=server/>           // this is my Label


     <asp:TextBox ID=TextBox1 Text="This is a TextBox" runat=server />     //this is my TextBox

Right now If i run this page there will be no gap/space between them so for this I will use &nbsp; tag between these two controls

Like this

     <asp:Label ID="Label1" Text="This is a Label" runat=server/>           // this is my Label
     &nbsp;&nbsp;                                                  //you can use as many &nbsp tag here as you want
     <asp:TextBox ID=TextBox1 Text="This is a TextBox" runat=server />     //this is my TextBox

Now if I run this page there will be space between Label and TextBox, if you want more space than just increase the number of &nbsp tag. thats it

I hope it was informative for you & I would like to Thank you for reading.

Tuesday, September 18, 2012

Bubble Sort Simple Program in C++

 This is a simple demonstration of Bubble Sort, I made this in C++ for my class fellows

You should use Dev C++ Compiler to compile this, this might not work in TC

1. The program will first ask the total number of values
2. Using Bubble Sort, it will sort all the values
3. Finally you will get a answer is sorted form


#include<iostream.h>
#include<conio.h>
main()
{
      int value[10];
      int temp;
      int values;
      cout<<"How many values do you want ? ";
    cin>>values;
    for(int b=1; b<=values; b++)
    {
    cout<<"Enter Value ";
    cin>>value[b];
    }         
              for (int b = 1; b < values-1; b++)
            {
                for (int a = 1; a < values; a++)
                {
                    if (value[a] > value[a + 1])
                    {
                        temp = value[a];
                        value[a] = value[a + 1];
                        value[a + 1] = temp;
                    }
                }
            }
            cout<<"\t\tSorted Answer\n\n";
            for(int b=1; b<=values; b++)
            {
                    cout<<value[b];
                    cout<<"\n";
             }
      getche();
      return 0;
      }

Download a .exe of this project from here


Friday, September 7, 2012

Access MasterPage variable in WebForm

Hello,
     Today we will see how can we access a variable in our WebForm which was created in MasterPage.
     We will create a button in WebForm and when a user click on the button the value of that variable will be assigned to Button Text.

So let's Start

1. First Create a ASP.Net project, by clicking on File menu >> New >> Project

2. From the left menu Select Web and than from right menu select ASP.NET Web Application

3. Click on OK

Now we will add a Master Page, so

4. In Solution Explorer, right click on your project than Add >> New Item

5. Select Masterpage, and click on Add

6. In the code section of MasterPage create a public string name it "msg"


Public String msg="Put any Value";

7. Assign any value to this string you want

Now we will Add a WebForm in our project so

8. Right Click on your project >> Add >> New Item

9. Select WebForm using MasterPage

6. Click on Add, you will be ask to Select a Master Page, so select Site1.Master and click on OK

7. Now in Solution Explorer, right click on your WebForm and click on View Markup

Now here we have to define @MasterType directive
this is important to access any variable in MasterPage

8.  So just below Page Title, copy and paste the following line

         <%@MasterType VirtualPath="~/Site1.Master" %> 


9. Now make a button in your WebForm

10.  Double Click on the button to go into it's Coding

11. From here we can use the Master property and can use that string which we created in Master Page

    Now to change the button text, paste the following line inside Button Method

    Button1.Text=Master.msg;

You can now easily access any variable of MasterPage in any of your WebForm.

If you have other WebForm and want to access variable Created in MasterPage than you will explicitly require to define MasterType directive in all your WebForm.

I hope this was informative for you, and I would like to Thank you for reading.

Sunday, August 19, 2012

Stop Clock Sync with host machine in Virtual PC

Hello everyone,
                        you might have noticed that whenever you change time in Virtual PC on a guest machine, it immediately synchronize it's time with the host machine, this can be very frustrated when you are working on an application which is time sensitive, like I had this problem when I was developing a Task Scheduler in C#

Anyways you can stop the clock synchronization between host machine and guest machine by following these steps

1. Open Virtual PC and start your guest Operating System

After it fully loads

2. Click on Start and than Click on Run and type services.msc

A window will pop-up listed all avalable services

3. Now here we have to find service

  •    Virtual Machine Additions Services Application
4. Right Click on the service and click on Stop

Note: You can also click on properties and set the startup type to Disabled, this way it will never starts at it's own, though you can manually start it later.

5. Close window

Now you can change the time in guest OS and this time it will not try to sync with the Host machine

I hope this for informative for you, And I would Like to thank you for reading

Saturday, August 11, 2012

Read textbox Buttons C#


   1:  private void BtnClick_Click(object sender, EventArgs e)
   2:    {
   3:      DialogResult Result;
   4:      Result = MessageBox.Show("Do you like my blog ? ", "Question", MessageBoxButtons.YesNo);
   5:        if (Result == DialogResult.Yes)
   6:           {
   7:               MessageBox.Show("You clicked on Yes :) ");
   8:           }
   9:         else if (Result == DialogResult.No)
  10:           {
  11:               MessageBox.Show("You clicked on NO  :( ");
  12:           }
  13:    }

In the above code
1. I have created a variable of DialogResult, (this variable will be use to store/identify which button did user press)

2. Than on line 5 we compare if the value in result variable equals to DialogResult.Yes than press

"You clicked on Yes"

Else

"You Click on No"

I hope this was informative for you, and I would like to thank you for reading.

Tuesday, July 24, 2012

Circles Within Circle OpenGL Code

We can create multiple circles within a Circles in OpenGL, with the following code, you can change the radius Color and width according to your own requirement.


   1:  #include<Windows.h>
   2:  #include<glut.h>
   3:  #include<math.h>
   4:   
   5:  void DrawCircle(float x, float y, float radius)
   6:  {
   7:      float DEG_RAD = 3.14159/180;
   8:      glBegin(GL_LINE_LOOP);
   9:   
  10:     for (int z=0; z<=360; z++)
  11:     {
  12:        float deg = z*DEG_RAD;
  13:        glVertex2f(x+cos(deg)*radius,y+sin(deg)*radius);
  14:     }
  15:     glEnd();
  16:  }
  17:  void Draw()
  18:  {   
  19:      glClear(GL_COLOR_BUFFER_BIT);
  20:      glColor3f(1.0 , 0.0, 0.9);
  21:      DrawCircle(0.0,0.0,0.9);
  22:      glColor3f(0.0 , 1.0, 0.0);
  23:      DrawCircle(0.0,0.0,0.7);
  24:      glColor3f(1.0 , 1.0, 0.0);
  25:      DrawCircle(0.0,0.0,0.5);
  26:      glColor3f(1.0 , 1.0, 1.0);
  27:      DrawCircle(0.0,0.0,0.3);
  28:      glEnd();
  29:      glFlush();
  30:  }
  31:   
  32:  void Initialize()
  33:  {
  34:      glClearColor(0,0,0,1);
  35:      glMatrixMode(GL_PROJECTION);
  36:      glLoadIdentity();
  37:      glOrtho(0.0, 0.0, 0.0, 0.0, -1.0, 1.0);
  38:  }
  39:   
  40:  void main(int iArgc,char** cppArgv)
  41:  {
  42:      glutInit(&iArgc,cppArgv);
  43:      glutInitDisplayMode(GLUT_SINGLE | GLUT_RGB);
  44:      glutInitWindowPosition(400,200);
  45:      glutInitWindowSize(500,400);
  46:      glutCreateWindow("Circles Within Circle by Muhammad Taqi :: www.techgulf.blogspot.com");
  47:      Initialize();   
  48:      glutDisplayFunc(Draw);
  49:      glutMainLoop();
  50:  } 

Wednesday, June 27, 2012

Chess in OpenGL Complete Code


   1:  #include<Windows.h>
   2:  #include<glut.h>   
   3:   
   4:  void Draw()
   5:  {
   6:      glClear(GL_COLOR_BUFFER_BIT);
   7:      float b=-0.99;             //  WIDTH
   8:      float c=-0.74;            //   WIDTH
   9:      float s=-0.99;           //    HEIGHT    
  10:      float e=-0.74;           //    HEIGHT
  11:      int a=0;  
  12:   
  13:      for(int o=0; o<8;o++)  
  14:      {
  15:          if(o==0 || o==2 || o==4 || o==6 || o==8 )
  16:              {   
  17:          for(a=0; a<8; a++)
  18:                     {
  19:                         glBegin(GL_POLYGON);
  20:                         glVertex3f(b,s,0.0);
  21:                         glVertex3f(c,s,0.0);   
  22:                         glVertex3f(c,e,0.0);
  23:                         glVertex3f(b,e,0.0);
  24:   
  25:                          if( a==0 ||  a==2 || a==4 || a==6 || a==8 )
  26:                             {
  27:                                glColor3f(0.0,0.0,0.0);
  28:                             }
  29:                          else
  30:                             glColor3f(1.0,1.0,1.0);
  31:                             glEnd();
  32:                             b=b+0.25;       
  33:                             c=c+0.25;                                  
  34:                             glFlush();
  35:                     }
  36:          b=-0.99;              //back to left position
  37:          c=-0.74;              //back to left position
  38:          }
  39:   
  40:          else if(o==1 || o==3 || o==5 || o==7 || o==9)
  41:              {       
  42:                  glColor3f(0.0,0.0,0.0);
  43:                  for(a=0; a<8; a++)
  44:                          {
  45:                              glBegin(GL_POLYGON);
  46:                              glVertex3f(b,s,0.0);
  47:                              glVertex3f(c,s,0.0);      
  48:                              glVertex3f(c,e,0.0);              
  49:                              glVertex3f(b,e,0.0);   
  50:   
  51:                              if( a==0 ||  a==2 || a==4 || a==6 || a==8)
  52:                                  {
  53:                                     glColor3f(1.0,1.0,1.0);
  54:                                  }
  55:                      else
  56:                          glColor3f(0.0,0.0,0.0);
  57:                          glEnd();
  58:                          b=b+0.25;      
  59:                          c=c+0.25;         
  60:                          glFlush();
  61:                          }   
  62:              }
  63:          b=-0.99;                
  64:          c=-0.74;                         
  65:          e=e+0.25;                 
  66:          s=s+0.25;                  
  67:          glColor3f(1.0,1.0,1.0);
  68:      }   
  69:  }
  70:   
  71:  void Initialize()
  72:  {
  73:      glClearColor(0.0,0.0,0.0,0.0);
  74:      glMatrixMode(GL_PROJECTION);
  75:      glLoadIdentity();
  76:      glOrtho(2.0,2.0,2.0,2.0,2.0,2.0);       
  77:  }
  78:   
  79:  int main(int iArgc,char** cppArgv)
  80:  {
  81:      glutInit(&iArgc,cppArgv);
  82:      glutInitDisplayMode(GLUT_SINGLE | GLUT_RGB);
  83:      glutInitWindowPosition(200,200);
  84:      glutCreateWindow("Chess By Muhammad Taqi");
  85:      Initialize();
  86:      glutDisplayFunc(Draw);
  87:      glutMainLoop();
  88:      return 0;
  89:  }


Wednesday, June 6, 2012

How to use DevC++ for OpenGl

Hello in this tutorial I'm gonna show you how you can use OpenGL in DevC++, I will also show how you can add libraries and properly link them to your project.

1. First Download the file from the link below, and extract it

Download

2. There are 3 files in this folder, we have to copy these files to their proper directory

glut.h
Copy this file to X:\Dev-Cpp\include\GL

libglut32.a
Copy this file to X:\Dev-Cpp\lib

glut32.dll

Copy this file to X:\Windows\System32 (link might be different for different OS)

3. Now open up your DevC++ Compiler

4. Click on File>>New>>Project

 5. Select Empty project, give your project a name and select C++ Project, and finally Click on OK

6. Now Click on File>> Source File

Now we have to link libraries So..

7. Now in the menu bar Click on project>> Project Option >>Parameters

 Here we need to add libraries for our code to work, So click on "Add Library or Object"

  • libopengl32.a
  • libglu32.a
  • libglut32.a  ( All these 3 files are located in X:\Dev-Cpp\lib)
Import them in the series as they are... Final look should be like this

9. Click on OK

10. Now copy the following code in your source file

#include<windows.h>
#include<gl/Gl.h>
#include<gl/glut.h>

void myInit(void)
{
     glClearColor(1.0,1.0,1.0,00);
     glColor3f(0.0f,0.0f,0.0f);
     glPointSize(4.0);
     glMatrixMode(GL_PROJECTION);
     glLoadIdentity();
     gluOrtho2D(0.0,640.0,0.0,480.0);
}
void myDisplay(void)
{
     glClear(GL_COLOR_BUFFER_BIT);
     glBegin(GL_POINTS);
     glVertex2i(100,30);   
          glVertex2i(100,130);
               glVertex2i(150,130);
               glEnd();
               glFlush(); 
}
main(int argc, char ** argv)
{
     glutInit(&argc,argv);
     glutInitDisplayMode(GLUT_SINGLE | GLUT_RGB);
     glutInitWindowSize(640,480);
     glutInitWindowPosition(100,150);
     glutCreateWindow("My First desigh");
     glutDisplayFunc(myDisplay);
     myInit();
     glutMainLoop();
 }

11. Compile and execute it,and it should work

Tuesday, May 1, 2012

WebSite Blocker C#

Hello,

 I have developed an application which can block websites. (Sort of Firewall)

Features

1. This Application can be use to block any website, without doing anything special.

2. All you need is to type the address like google.com, and press the block button (You will need to re-open your browser)

3. Once blocked all users within that computer will not be able to access that webpage.

4.You can also unblock those website using this software.

*You will need Framework 4.0, for this app to work

Download the app from HERE

Please try the app, and share your thoughts

Thanks

Wednesday, April 18, 2012

How to add Add DataBase in Visual Studio

Hello everyone today I am gonna teach you how you can add database in your project in Visual Studio, I will also show the method to make a primary key (Which is unique), and Identity Specification which increment whenever there is a new entry.

1. Create a project in VS

2. Under solutin Explorer, right click on your database hover your mouse to "Add" and click on "New Item"

3. Select "SQL Database" from the list, and click on OK

4.  Now open up your Server Explorer or press Ctrl + W + l

5. You will find your database .mdf  in server Explorer , double click on it to expand

6. Under your database right click on "Tables", and select "Add New Table"

7. You will see three column Column Name, Data Type, Allow Nulls (By default)

8. I have defined 3 columns  like below


9. Now we will set the Student ID as the primary key, to do this right click on the student ID and select "Set Primary Key"

10. Now if we want the student ID to be auto incremented whenever a new record is being added, we will need to set its "Identity Specification"

11. Right click on Student ID column, and below you will find "Column Properties", in Column properties search for "Identity Specification", expand it and you will find "Is Identity". By default it is set to No, so double click on it and it will be set as Yes.

12. Now you can set the identity Increment & Identity Seed according to your need, by default both are set to 1

To View your tables, open up Server Explorer right click on your table and select Show Table Data

I hope you enjoyed the tutorial, if you are still having problem than please post a comment

Thanks.

Wednesday, March 28, 2012

How To Use Delegates In C# Easy Tutorial

While trying to access TextBox, RichTextBox etc you might encounter a error like


This error indicate that you cannot use TextBox or RichTextBox from any other tread except the default one.

To Access TextBox in your own thread you will need to use delegates for that.

Below is a simple code, in which I made 2 threads and 2 buttons (You will need to add 2 buttons in your project manually)

* DelegateWrite (Which write in the TextBox)
* DelegateRead (Which read from the TextBox)

Download .exe of this project from here (you will need Framework 4.0 installed)

1:  using System;  
2:  using System.Collections.Generic;  
3:  using System.ComponentModel;  
4:  using System.Data;  
5:  using System.Drawing;  
6:  using System.Linq;  
7:  using System.Text;  
8:  using System.Windows.Forms;  
9:  using System.Threading;  
10:  namespace Delegates  
11:  {  
12:    public partial class Form1 : Form  
13:    {  
14:      public Form1()  
15:      {  
16:        InitializeComponent();  
17:      }  
18:      void DelegateWrite()  
19:      {  
20:        if (textBox1.InvokeRequired)  
21:        {  
22:          textBox1.Invoke(new MethodInvoker(DelegateWrite));  
23:        }  
24:        else  
25:          textBox1.Text="String Generated from Delegate";  
26:      }  
27:      void DelegateRead()  
28:      {  
29:        if (textBox1.InvokeRequired)  
30:        {  
31:          textBox1.Invoke(new MethodInvoker(DelegateRead));  
32:        }  
33:        else  
34:          MessageBox.Show(textBox1.Text);  
35:      }  
36:      private void button1_Click(object sender, EventArgs e)  
37:      {  
38:        Thread objthread = new Thread(new ThreadStart(DelegateWrite));  
39:        objthread.Start();  
40:      }  
41:      private void button2_Click(object sender, EventArgs e)  
42:      {  
43:        Thread objthread = new Thread(new ThreadStart(DelegateRead));  
44:        objthread.Start();  
45:      }  
46:    }  
47:  }  

Friday, March 23, 2012

HOW TO CREATE BOOTABLE ISO OF WINDOWS 7 100% WORKING

Hello everyone, today I am gonna teach you how you can make a bootable ISO of windows 7,2008 R2 Server without any software like nero,magic ISO, alcohol etc. The procedure is quite simple,

For this you will require :

- Bootable CD of windows 7
- cdimage Download from here
(file is password protected, password is taqi)

1. Make a folder in C drive name it win7

2. Copy all the file and folder from windows 7 CD in win7 folder in c drive i.e. c:\win7\ (MAKE SURE YOU DO THIS RIGHT)

2. Download the cdimage from the link provided above

3. Extract the cdimage.exe in root portion of C drive i.e. c:\cdimage.exe

4. Now open up your command prompt from run by typing cmd

5. In command prompt goto C drive and press enter

6. Now copy the command listed below as it is, and press enter

cdimage.exe -lWIN_EN_DVD -m -u2 -bc:\win7\boot\etfsboot.com c:\win7\ c:\win7.iso"


cdimage will start making the bootable iso file in your c drive as "win7.iso", this method is tested and found 100% working

If you have any problem, than please comment here

Thanks

Wednesday, March 21, 2012

Compare two textboxes in C#

Comparing TextBoxes is quite easy in c#, below is a simple code that compare two textbox

:  namespace Comparing  
2:  {  
3:    public partial class Form1 : Form  
4:    {  
5:      public Form1()  
6:      {  
7:        InitializeComponent();  
8:      }  
9:      private void button1_Click(object sender, EventArgs e)  
10:      {  
11:        if (textBox1.Text == textBox2.Text)  
12:          MessageBox.Show("String matched");  
13:        else  
14:          MessageBox.Show("String does not match","Result");  
15:      }      
16:    }  
17:  }  

I added 1 Button and 2 TextBoxes, when we press the button the program will tell us weather the the string in TextBox matches or not.

you will need to add two textbox and a button in your project for the above code to work

Download project .exe from here

Wednesday, March 14, 2012

CREATE A TEXT FILE AND WRITE IN IT C# EXAMPLE

In C# creating and writing on a Text file is really easy as compared to C, C++. Below is the code written is Visual Studio 2010 which creates a file called "abc.txt" in D drive, and than write some string in it finally we save that string in the file.

You will need to add a System.IO namespace on the top of your program in order to successfully run this code

1:   StreamWriter objstreamwriter = new StreamWriter(@"D:\abc.txt", true); //specify path for the file, true indicate weather to overwrite the file if it already exist  
2:   objstreamwriter.WriteLine("Write this string in the Text file located at D drive");  
3:    objstreamwriter.Flush();  


Points to note:
  • StreamWriter is the class which we are using to create File
  • objstreamwriter is the object of class StreamWriter
  • WriteLine is the method of StreamWriter class which write text and at the end automatically escape a line i.e. Enter
  • Flush() is a method that we used to save the text in the file
If you have any queries please post comment.

Thanks

    Monday, January 16, 2012

    How to conenct FaceBook with Windows Live

    Facebook is a social networking website that helps you connect and share what you're doing with the people in your life. In order to connect your Windows Live account with FaceBook just follow these easy steps!

    1. Log-in to your hotmail account

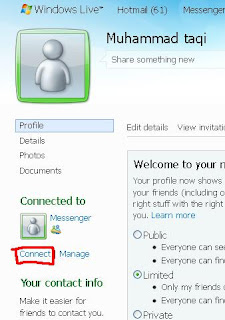
    2. On the top right side below you name, click on profile


    3. Now on the left side, above "Your Contact Info", click on Connect


    4. On the Next Page Click on "Facebook"


    5. Set notification setting according to your need, and than click on Connect with Facebook

    6. If you are not logged into your FaceBook account you will require to log-in first ,than A window will pou-up asking you for permission, just click on Allow

    After you click on Allow, your hotmail page will refresh automatically, and you should see a right sign on FaceBook


    You have now successfully connected your windows live with FaceBook.