| Hi guys, in this post I am going to walk you people through using UpdatePanel this would be good start for beginners who want to learn AJAX. AJAX is there in the .Net framework from the beginning in order to facilitate develops to develop web applications with richer and more responsive UI for better user experience. |
| Applications with AJAX give the illusion of desktop based application in web application to the end user.Microsoft has provided bunch of AJAX based control in AJAX control toolkit to satisfy developer needs. Most basic of them is UpdatePanel. So let's kick off this exercise. |
| First of all copy the above written code and paste it in aspx file. |
| <table> <tr> <td> <asp:ScriptManager ID="smPage" runat="server" /> <asp:UpdatePanel ID="upText" runat="server"> <ContentTemplate> <asp:Label ID="lblText" runat="server" Text="Default Value" /> </ContentTemplate> <Triggers> <asp:AsyncPostBackTrigger ControlID="ddlValue" EventName="SelectedIndexChanged" /> </Triggers> </asp:UpdatePanel> </td> </tr> <tr> <td> <asp:DropDownList ID="ddlValue" AutoPostBack="true" runat="server" OnSelectedIndexChanged="ddlValue_SelectedIndexChanged"> <asp:ListItem Text="One" Value="1" /> <asp:ListItem Text="Two" Value="2" /> </asp:DropDownList> </td> </tr> </table> |
Step 1: |
| In the above written code first I add ScriptManager control. This control does not have UI but it is required for UpdatePanel control to run all the scripts created by ASP.Net engine. |
| <asp:ScriptManager ID="smPage" runat="server" /> |
It is a server-side control that sits on your Web Form and enables the core of ASP.NET AJAX. Its primary role is the arbitration of all other ASP.NET AJAX controls on the Web Form and the addition of the right scripting libraries to the Web browser so that the client portion of ASP.NET AJAX can function. |
| Step 2: |
| Secondly we've Add UpdatePanel which is a container control. Controls which I want to update on SelectedIndexChanged will go in this is container. UpdatePanel requires two pieces of information: |
| <asp:UpdatePanel ID="upText" runat="server"> ….. </ asp:UpdatePanel> |
|
| ContentTemplate contains control which I want to update on certain event asynchronously (means without postback) |
| Trigger are of two types tell these: |
|
| AsyncPostBackTrigger specify that these are the controls and these are their events on which controls defined in ContentTemplate will update asynchronously. |
| PostBackTrigger specify that this is the control which must be in the UpdatePanel in ContentTemplate is allowed to cause postback |
| Up till now I have done with telling you what is ContentTemplate and what is PostBackTrigger. So now it's time to add controls in UpdatePanel. |
| To keep this example simple I just have added a Label control in UpdatePanel. what I am doing in this example is I am going to update Label control on the OnSelectedIndexChanged event of Dropdown with the SelectedItem's text. |
| <ContentTemplate> <asp:Label ID="lblText" runat="server" Text="Default Value" /> </ContentTemplate> |
After adding control(s) to ControlTemplate, now I am adding Trigger. |
| <Triggers> <asp:AsyncPostBackTrigger ControlID="ddlValue" EventName="SelectedIndexChanged" /> </Triggers> |
We were required to specify two piece of information and we are done with that. Now It's time to add control which cause asynchronous postback. |
| <asp:DropDownList ID="ddlValue" AutoPostBack="true" runat="server" OnSelectedIndexChanged="ddlValue_SelectedIndexChanged"> <asp:ListItem Text="One" Value="1" /> <asp:ListItem Text="Two" Value="2" /> </asp:DropDownList> |
Step 3: |
| Now it time to add server side code. This code will run when DropDownList cause asynchronous postback when selected index of DropDownList change. |
| protected void ddlValue_SelectedIndexChanged(object sender, EventArgs e) { lblText.Text = ((ListControl)(sender)).SelectedItem.Text; } |
We are done with exercise. Try it and have a nice day :). |
Saturday, September 25, 2010
AJAX: GETTING STARTED
Saturday, September 18, 2010
ASP.NET: CREATING GRIDVIEW WITH BOUND AND TEMPLATE FIELDS
| As a developer I have face issue of slipping the code from mind which has drove me nuts some time for 2 to 3 hours and most of the time it happened when it came to write code for GridView control. I don't use GridView that frequently because Repeater control is their which faster and lighter; However, at time a requirement arise when there is no way out. |
| So I decide to blog the code over the internet for my and others convenience. |
| As compared to Repeater control GridView control is heavy... but it provides lots of other features which are help full in rapid application development for instance paging and sorting. |
| In this post I am goanna demonstrate a very simple GridView example which has two bound columns (BoundField) and one template column (TemplateFdeld). I will bind this GridView with generic list. |
| Step 1: |
| First of all we need to create a GridView. In the following HTML I just have created a GridView by writing following line. AutoGenerateColumns property is telling that no need to generate columns automatically, if I turn this property true GrivView look in the data source assigned to it and creates columns according to that data source. |
| <asp:GridView runat="server" AutoGenerateColumns="False"> ....... </asp:GridView> |
| This step is equal to the step of dropping GridView control on the page from toolbar in designer mode. |
| Step 2: |
| After adding GridView control to the aspx page now it's time to create columns. We can define different types of columns depending upon our requirement. |
| BoundField - If we want data to be shown as it is in the data source for instance ProductId from Product's data source or Student Id. We just need to provide DataField and GridView takes care of binding this field. When using BoundField GridView treats all the data as string or it convert all the data to its string representation for instance: Boolean data will change to true or false that is what string representation is. |
| TemplateField - If we want to show different data on different conditions we can use TemplateField for which we need to assign the value manually. TemplateField allow developer to add control of his choice in the column. |
| Developers have the liberty of adding several other types of fields in GridView for example ImageField, CheckBoxField, HyperLinkField, CommandField, and ButtonField but in order to keep this example simple I am only using BoundFiels amd TemplateField. |
| All the columns developer adds in the GridView goes between column tag and adds in the GridView's column collection. |
| <Columns> ...... </Columns> |
| To add columns in the GridView add following piece of code between GridView Starting and Ending tags. |
| <Columns> <asp:BoundField DataField="StudentId" HeaderText="Student Id" /> <asp:BoundField DataField="StudentName" HeaderText="Student Name" /> TemplateField Visible="true" HeaderText="has Qualify For Scholarship"> <ItemTemplate> <asp:CheckBox id="chkQualifyForScholarship" runat="server" Checked='' /> </ItemTemplate> TemplateField> </Columns> |
| In te above code I have used this <!--Convert.ToBoolean(Eval("QualifyForScholarship"))--> notation. This is asp code, any code comes between <% and %> is asp code and runs on the server. What I have dont hear is I typecast the field in the data source to Boolean and assign this Boolean value to Checked property of ChechBox control. This cause CheckBox control to show checkbox checked on true and un checked on false. Eval() is the method to fetch value from data source when writing inline asp code. |
| Step 3: |
| EmptyDataTemplate - We can also specify if there are no records in the data source how empty row will be shown with some user-friendly message by using EmptyDataTemplate rather than using label and showing message in it after checking data source whether it does have records or not. |
| <EmptyDataTemplate> ...... </EmptyDataTemplate> |
| There are several other templates available in GridView out of the box but they are not in the scope of this article. I'll discuss them in upcoming posts. |
| Following is the complete HTML of GridView which I have discussed. All you need to do is copy and paste in the .aspx page. |
| <table> <tr> <td> <asp:GridView runat="server" AutoGenerateColumns="False"> <Columns> <asp:BoundField DataField="StudentId" HeaderText="Student Id" /> <asp:BoundField DataField="StudentName" HeaderText="Student Name" /> <asp:TemplateField Visible="true" HeaderText="has Qualify For Scholarship"> <ItemTemplate> <asp:CheckBox id="chkQualifyForScholarship" runat="server" Checked='' /> </ItemTemplate> </asp:TemplateField> </Columns> <EmptyDataTemplate> no student found. </EmptyDataTemplate> </asp:GridView> </td> </tr> </table> |
| We have done with HTML, now it's time to write CS code. |
| Step 4: |
| In this example I am goanna use generic list of custom developed class. So first we need to create class named Student with three variables named StudentId (data type: Int32), StudentName (data type: String), QualifyForScholarship (data type: Boolean). |
| NOTE: Remember to create properties otherwise at the time of binding GridView will raise en exception. |
| public class Student { private Int32 studentId; public Int32 StudentId { get { return studentId; } set { studentId = value; } } private String studentName; public String StudentName { get { return studentName; } set { studentName = value; } } private Boolean qualifyForScholarship; public Boolean QualifyForScholarship { get { return qualifyForScholarship; } set { qualifyForScholarship = value; } } } |
| Step 5: |
| As we have done with creating business entity now it's time to utilize it. All we need to do is create an object of typed list List<Student> and add objects of Student type in this list. Following is the code for get this thing done. Add the following code in load event of the aspx page. |
List lstStudent = null; lstStudent = new List(); Student objStudent = null; objStudent = new Student(); objStudent.StudentId = 1; objStudent.StudentName = "Salman Abbass"; objStudent.QualifyForScholarship = false; lstStudent.Add(objStudent); objStudent = new Student(); objStudent.StudentId = 2; objStudent.StudentName = "Asad Abbass"; objStudent.QualifyForScholarship = true; lstStudent.Add(objStudent); objStudent = new Student(); objStudent.StudentId = 3; objStudent.StudentName = "Kashif Abbass"; objStudent.QualifyForScholarship = true; lstStudent.Add(objStudent); objStudent = new Student(); objStudent.StudentId = 4; objStudent.StudentName = "Ali Raza"; objStudent.QualifyForScholarship = false; lstStudent.Add(objStudent); objStudent = new Student(); objStudent.StudentId = 5; objStudent.StudentName = "Taqi Raza"; objStudent.QualifyForScholarship = false; lstStudent.Add(objStudent); dgStudent.Data source = lstStudent; dgStudent.DataBind(); |
| This is all we need to do. Run the code and enjoy, have a nice day :). |
Monday, September 13, 2010
MOSS 2007: CONFIGURE SEARCH SERVICE IN MOSS 2007
MOSS 2007 has got great capability of searching. When the first version of SharePoint came which was name as SPS (SharePoint Portal Services) 2001, Microsoft badly pitch its searching feature. At the time searching in MOSS does not only search documents by name even it can search inside the documents, which was a quite unique functionality in that era. Now in MOSS 2007 searching capability has got pretty much mature.
In addition with full text searching with in MOSS 2007 site it provide network search means it can search files residing over the network shared folder, it provides searching over public folder in exchange, it also provides searching capability in AD, and it is not the end Users can now search data on external websites like http://www.bbc.com form MOSS 2007. Isn't it a great feature?
Now Microsoft has provided two flavors in SharePoint.
These products differ by their feature.
In order to configure search functionality, one needs to configure it in the Central administration and then in the SharePoint site. Following are the step by step process to get this thing done.
Creating Content Source:
Open Central Administration, and click on Shared Services Administration in quick launch bar at left hand side.
NOTE: This option allows you to search files from you network places.
Creating Scope:
Consuming Scope in MOSS 2007 Site:
Search has been configured now, you can test it now. If it doesn't return results wait for some time depending up on the time your server take to crawl and update scope, then make search. Have a nice day :).
In addition with full text searching with in MOSS 2007 site it provide network search means it can search files residing over the network shared folder, it provides searching over public folder in exchange, it also provides searching capability in AD, and it is not the end Users can now search data on external websites like http://www.bbc.com form MOSS 2007. Isn't it a great feature?
Now Microsoft has provided two flavors in SharePoint.
- MOSS 2007 which is licensed product
- WSS 3.0 which is all free
These products differ by their feature.
| MOSS 2007 | WSS 3.0 | |
| SharePoint site search | Y | Y |
| AD Search | Y | N |
| Exchange Folder Search | Y | N |
| Network Shared Folder Search | Y | N |
| External Site Search | Y | N |
In order to configure search functionality, one needs to configure it in the Central administration and then in the SharePoint site. Following are the step by step process to get this thing done.
Creating Content Source:
Open Central Administration, and click on Shared Services Administration in quick launch bar at left hand side.
- Manage this Farm's Shared Services page will be opened. Now click on the SSP you want to configure search service on.
- Under the head of Search click Search settings.
- Under the head of Crawl Settings click Content sources and crawl schedules.
- Click New Content Source.
- Fill in the Name field.
- Select File Shares in Content Source Type.
NOTE: This option allows you to search files from you network places.
- Type in the address of network location in the Start Addresses section.
- Create crawl schedules for incremental and full crawl in the Crawl Schedules section.
- Select the check box in the Start Full Crawl, and press OK.
Creating Scope:
- Open Central Administration, and click on Shared Services Administration in quick launch bar at left hand side.
- Manage this Farm's Shared Services page will be opened. Now click on the SSP you want to configure search service on.
- Under the head of Search click Search settings.
- Under the head of Scopes click View Scopes.
- Now click New Scope.
- Fill in all the fields and select Use the default Search Results Page option.
- Click OK.
- Now Update Status of the scope will be shown as Empty, Click Add rules besides it.
- Add Scope Rule page will be opened; in the Scope Rule Type section select Content Source.
- Select the desired content source from the dropdown list in Content Source section.
- In the Behavior section, select Include - Any item that matches this rule will be included, unless the item is excluded by another rule option.
Press OK.
Now it's time to configure search in MOSS 2007 site.
Consuming Scope in MOSS 2007 Site:
- Browse the site; navigate to Site ActionsàSite Settings under the head of Site Collection
Administration click Search Settings. - On the Search Settings page, Select Use custom scopes. Display richer results using the following Search Center and type in the URL of the page which will show the search result.
- Press OK.
- Navigate to Site ActionsàSite Settings under the head of Site Collection Administration click Search scopes.
- Click Display Group: Search Dropdown, and check the Display check box for your search scope.
- Press OK.
- Repeat step 1 to 6 for Display Group: Advanced Search.
Search has been configured now, you can test it now. If it doesn't return results wait for some time depending up on the time your server take to crawl and update scope, then make search. Have a nice day :).
Saturday, September 11, 2010
HOW TO GET FULL SPEED FROM YOUR ISP
For those who want to get full available bandwidth from their ISP, here is a trick to get it called QoS.
Basically QoS "Quality of Service" is a feature in windows xp or later version of Windows. which reserve 20% of your bandwith for its own use just like "Windows Update"
Now if you don't use Automatic Update, than you may take that reserve bandwidth from Windows for your own use.
To do this :
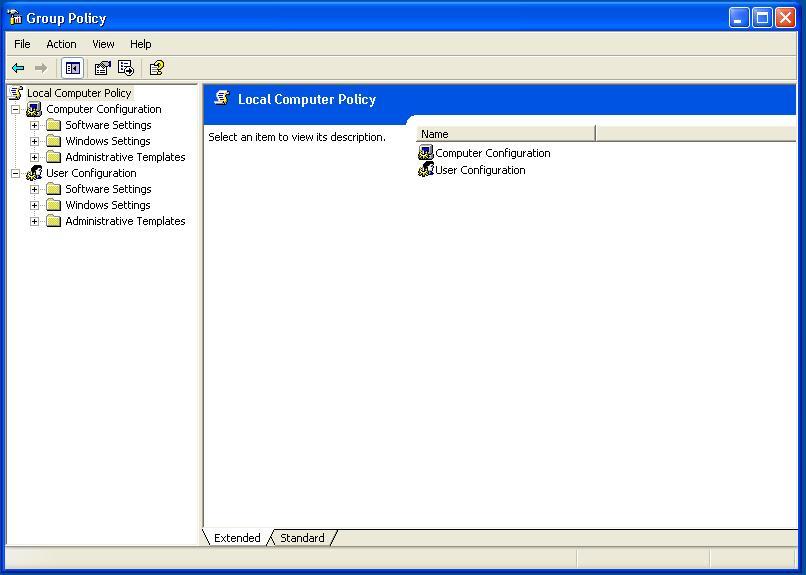
1. Click on "Start" and than "Run" and type gpedit.msc

A window will open like this:

Under Computer Configuration, expand "Administrative Templates" than expand "Network" and than click on "QoS Packet Scheduler"

Now after clicking on QoS Packet Scheduler, On the Right hand side window double-click on "Limit reservable bandwidth"


By default it is Not Configured, means that it has reserved 20% bandwidth, to get this reserved bandwidth back. Click on Enable, and than put 0 in Bandwidth Limit %., and click OK

You will be required to restart you PC after this.
By this way you can use full bandwidth that is your ISP providing you.
Basically QoS "Quality of Service" is a feature in windows xp or later version of Windows. which reserve 20% of your bandwith for its own use just like "Windows Update"
Now if you don't use Automatic Update, than you may take that reserve bandwidth from Windows for your own use.
To do this :
1. Click on "Start" and than "Run" and type gpedit.msc

A window will open like this:
Under Computer Configuration, expand "Administrative Templates" than expand "Network" and than click on "QoS Packet Scheduler"

Now after clicking on QoS Packet Scheduler, On the Right hand side window double-click on "Limit reservable bandwidth"


By default it is Not Configured, means that it has reserved 20% bandwidth, to get this reserved bandwidth back. Click on Enable, and than put 0 in Bandwidth Limit %., and click OK

You will be required to restart you PC after this.
By this way you can use full bandwidth that is your ISP providing you.
Tuesday, September 7, 2010
T-SQL: HOW TO USE T-SQL TOP KEYWORD
In this post I am gonna tell you how to use T-SQL top keyword. Basically top keyword is use to show top records from the result set. Top keyword takes no of rows as an argument and shows them from the result set.
SELECT TOP(5)
SI.Name,
SUM(MarksObtained) 'Marks Obtained'
FROM StudentCourse SC
JOIN StudentInfo SI ON SI.StudentId = SC.StudentId
GROUP BY SC.StudentiD, SI.Name
ORDER BY SI.Name DESC
This is how you can utilize top keyword. Have a nice day.
SELECT TOP(5)
SI.Name,
SUM(MarksObtained) 'Marks Obtained'
FROM StudentCourse SC
JOIN StudentInfo SI ON SI.StudentId = SC.StudentId
GROUP BY SC.StudentiD, SI.Name
ORDER BY SI.Name DESC
This is how you can utilize top keyword. Have a nice day.
ASP.NET: HOW TO RE REGISTER ASP.NET VERSION # IN IIS
| 1. Open command prompt. Navigate to the following path: |
| <drive letter>:\Windows\Microsoft.NET\Framework\<version #>\ |
| 2. Run following command to un register ASP. Net version #. |
| aspnet_regiis -u |
| 3. Run following command to register ASP. Net version #. |
| aspnet_regiis -i |
| That's all you need to do. Have a nice day :). |
SQL SERVER: RESTORING DATABASE

When you are getting this error means you have already created a database object and you are trying to restore database over it.
All you need to do is to delete the existing database on which u are trying to restore database. Then follow the following steps:
- Right click the Databases node in the object explorer and click Restore Database…
- Under the head of Source for restore select From device: then click this
button.
- Specify Backup widow will be opened. Click Add button to specify backup file.
- Locate the backup file.
NOTE: if file is not present in the location where it is, make sure to select All Files(*) in the Files of type. - Press OK, and again press OK.
- Then select Restore checkbox from the Select the backup sets to restore: grid.
- In the To database: select the database.
NOTE: in this dropdown a database having the same name as your database will be present, select it. - Press OK.
- Following successful message will be appeared.


Have a nice day :).
Friday, September 3, 2010
ASP.NET: CREATING MULTILINGUAL WEB SITE
| In this article I will demonstrate how to use globalization to create multilingual web application. This article is written to target beginner level audience. | |
| As the requirement of software is increasing issues are also emerging, one of the issue is to customize the application for different region. This type of customization requires lot of donkey work to be done. So that labels text, date time format, and currency format and other things which are dependent on regions can be changed. | |
| Microsoft .Net has provided a mechanism known as Globalization to handle this type of issues so that minimal amount of change is required. With .Net it is now very easy to develop multilingual web application. When we talk about globalization another terms comes in our mind which is localization, so first let us make a clear picture about these terms. | |
| Globalization: Is about making the application for global use so that it can be used in different region of the world. | |
| Localization: The term localization refers to process of creating the content of application according to some specific region. | |
| Now we can say that in-order to achieve globalization we need to do localization, because until and unless we create localized contents for different regions we cant globalized our application. | |
| In this example I change the culture of the application on the fly by passing agreement to the page via query string. So let’s start by creating a web Application. | |
| 1. Open Visual Studio and click on Project in front of Create. | |
 | |
| 2. Select Web under the node of Visual C# in Project types box and then select ASP.Net Web Application in the Templates box. | |
 | |
| 3. Fill the Name and Solution Name text boxes with project name and solution name respectively and click OK.New project will be created containing Default.aspx page leave it as it is for future use. | |
| 4. Right click in the GlobalResource.Web -->Add-->Add ASP.Net Folder-->App_GlobalResources.A folder with the name App_Globalresources will be created. | |
 | |
| 5. Right click on the App_GlobalResources-->Add-->New Item…, Add New Item window will be opened. | |
| 6. Click on General under the node of Visual C# in Categories box and select Resources File from the Templates box beside it, Enter the ApplicationResources.resx in the Name field. | |
 | |
| 7. Add two more resource files with the name ApplicationResources.ar-OM.resx and ApplicationResources.en-US.resx. | |
| 8. Now the Solution Explorer will somehow look like this. | |
 | |
| 9. Put the following xml at bottom of ApplicationResources.ar-OM.resx file. | |
| <data name="HelloWorld" xml:space="preserve"><value>مرحبا العالمي</value> </data> <data name="SelectLanguage" xml:space="preserve"> <value>اختر اللغة</value> </data> | |
| Add following xml in ApplicationResources.resx and ApplicationResources.en-US.resx file. | |
| <data name="HelloWorld" xml:space="preserve"><value>Hello World</value> </data> <data name="SelectLanguage" xml:space="preserve"> <value>Select Language</value> </data> | |
| 10. To make this article as simple as possible It will only add one two Labels, and one DropDownList control. Following is the html of aspx file. | |
| |
| In the above written HTML "<%$ Resources:TestSiteResources, SelectLanguage %>" is used for accessing resource file entries from HTML. | |
| 11. Add following code in CS file of the page. | |
| using System;using System.Globalization; using System.Threading; namespace Globalization.Web { public partial class _Default : System.Web.UI.Page { protected override void OnInit(EventArgs e) { base.OnInit(e); } protected override void InitializeCulture() { base.InitializeCulture(); if (Request.QueryString["LangId"] != null) { if (Request.QueryString["LangId"] == "0") { Thread.CurrentThread.CurrentUICulture = new CultureInfo("en-US"); } else if (Request.QueryString["LangId"] == "1") { Thread.CurrentThread.CurrentUICulture = new CultureInfo("ar-OM"); } } } protected void ddlSelectLanguage_SelectedIndexChanged(object sender, EventArgs e) { Response.Redirect("Default.aspx?LangId=" + ddlSelectLanguage.SelectedValue); } } } | |
| 12. In the above written C# code In order to change Culture Information I have overridden InitializeCulture() method and change the culture information of the page. I this method I only change the CurrentUICulture because the impact of my change is only related to UI. If I were need to change the currency, date, time then I also need to change CurrentCulture as well.I also have implemented the SelectedIndexChanged event of the DropDownList control to reload the page and passing selected language identifier in the query string. | |
| That’s what all you need to do. Now compile and run the application. Have a nice day :). |
Subscribe to:
Posts (Atom)