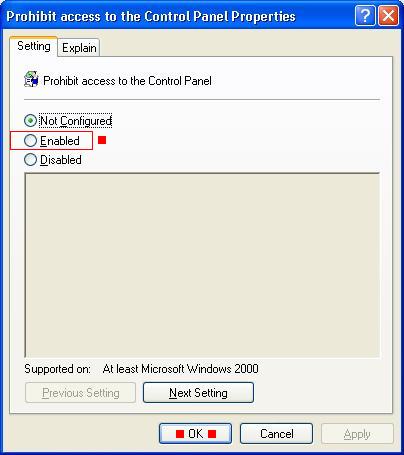
If you want your user not to be able to access control panel neither be able to use any component which is located in control panel for any reason than you can easily do this by following these simple steps
1. Click on start, than run, and type gpedit.msc
2. Now expand User Configuration, than Administrative Templates, than click on Control Panel
3. Now on the right side double click on Prohibited access to the Control Panel
4. Now select Enable, and click on OK
Now Control Panel will be remove from your startmenu, no one will be able to access control panel neither any of its components.
To verify this you can perform the following
1. Double click on Date/time in taskbar
2. Type control in Run command
If you are worried about your computer being infected with virus, than you should disable Autorun feature. Because mostly viruses come with USB in a file called autorun.inf
To disable Autorun feature in windows xp follow these simple steps.
1. Click on start, than click on run, and type gpedit.msc
2. Now expand Computer Configuration, than expand Administrative templates, than click on System
3. Now on the right hand side window, double click on Turn off Autoplay
4. Select Enabled, and below this select All drives
6. Now Click on Apply, and OK
You have successfully disabled Autorun.
Next time when you insert USB, windows won't perform any autorun action.
Also note don't open your USB drive by double clicking or pressing enter key, instead right click on it and select Explore, this way autorun.inf file will not be executed. Same precaution can be apply for HHD partitions
Since I started ASP.NET I had always been in the confusion that what is the difference between Server.Transfer() and Response.Redirect(). Tried a lot but dint got succeed to find out the right description. And this thing gets more irritating when it comes to giving interviews. As I am an ASP.Net programmer interviewer expects I should know it, and I should have, However; if you search it over the internet you’ll find lots of posts same was the case with me but none of them solve my issue.
So I decide to write the post on it so that no one will do the donkey work which I did. I am writing this post for beginner and intermediate audience in ASP.Net.
Server.Transfer()
Response.Redirect()
Does not allow to navigate to url outside the current server and current site, it requires virtual path and if you try to do so following exception will occur
Invalid path for child request 'http://….'. A virtual path is expected
Allows navigate to the URL outside the current server.
Does not cause round trip (postback)
Cause round trip (postback)
Does not show the redirected URL. Means you are running a website at following URL.
Explanation: When a user opens browser, type in the request in the address bar, and hit enter request goes to server and at the same time browser is also aware of the fact that what the URL is.
As we know that Server.Transfer() does not cause post back and directly redirects form the server side to the requested page that is why URL in the address bar does not update.
URL in the address bar change accordingly when using Response.Redirect().
It happens because of the fact that Response.Redirect() cause a post pack then redirects to the request page. When Response.resirect() cause a post back it takes the URL of the requested page to the client and then browser make a request the that URL.
In-order to update URL in the address bar browser requires complete cycle which starts from requesting URL from browser and sending HTML back to the browser.
Can only redirect to .aspx pages not to html pages.
Can redirect to .aspx pages and html pages.
When to Use?
Server.Transfer()
Response.Redirect()
We want to transfer current page request to another .aspx page on the same server
We want to redirect the request to some plain HTML pages on our server or to some other web server
We want to preserve server resources and avoid the unnecessary round trips to the server
We don't care about causing additional round trips to the server on each request
We want to preserve Query String and Form Variables (optionally)
We do not need to preserve Query String and Form Variables from the original request.
We don't need to show the real URL where we redirected the request in the users Web Browser
We want our users to be able to see the new redirected URL where he is redirected in his browser (and be able to bookmark it if it’s necessary)
Hello, I am here again with a new topic 'Structured Settlement Annuity' and today I am going to tell you what Structured Settlement Annuity is. The reason behind choosing this I have choosing this topic is that I have found many people asking about it over the internet, however; it is not related to IT but it is informative. So I did my R&D and decide to share this information you people.
Structured Settlement Annuity is more often a result of legal action which happens between parties where financial award is given to one party by another party as a result court action. Generally it is in the form of payments because a court has stated up so that based on the life span of the person who won this settlement usually from the car accident or some form cause physical injury.
After legal fee are paid whatever balance of the insurance companies settlement will go into annuity and insurance company will then pay the party a payment over time. Sometimes this can be a lump sum payment (large chunk of money given o the individual), however; more often it is monthly income stream designed to replace income that may have been lost as a result of the action, as a result of legal action. This is called a Structured Settlement Annuity.
This was the short introduction about Structured Settlement Annuity. I'll cover it in detail in my upcoming posts.
It has always been a problem when it comes to understand provider in .Net and most of the people miss conceptualized it specially beginners, same was the case with me. So I decide to a post on it. I am writing this post for beginner and intermediate level audience.
What is provider in .Net implementation?
At grass root level provider is a dll (class library) which contains the some specific implementation. For instance:
ActiveDirectoryMembershipProvider this provider is used for authenticating user from active directory in domain environment. We refer to this provider by using its fully qualified name.
SqlMembershipProvider this provider is used for user authentication from the database created by aspnet_regsql.exe command. We refer to this provider by using its fully qualified name.
System.Web.Security.SqlMembershipProvider
This dll knows the schema of the database created by aspnet_regsql.exe command. It also contains methods to authenticate user, create user, edit user, delete user etc.
When using these providers we don’t need to worry about writing code because Microsoft has already done that job for us. All we need to do is:
1.Specify the provider and it configuration in web.config.
2.Specify the provider in the ASP.Net login controls so that they can utilize this provider.
You can even write your own provider let’s say you want to authenticate users from Linux domain, so u can write your own provider which has the implementation for authenticating user from Linux domain.
There are several other providers shipped with .Net framework and all of them server different purpose.
Site map -- System.Web.XmlSiteMapProvider
Profile -- System.Web.Profile.SqlProfileProvider
Session state -- System.Web.SessionState.InProcSessionStateStore -- System.Web.SessionState.OutOfProcSessionStateStore -- System.Web.SessionState.SqlSessionStateStore
So the rule of thumb is provider is nothing but a dll which server what it is written for. Hope this post help you people, have a nice day :).
With the release of Visual Studio 2005 Microsoft introduce new login controls in .Net framework 2.0 so that developers do not need to write same code again and again. Microsoft has provided different providers for them to connect with different user data sources.
In this post I am going to discuss how to configure membership provider for active directory. It very common scenario that you need to create an intranet application and provide the functionality to the office employees to connect the application using domain user.
In order to connect to active directory you need to have active directory deployed. If you don’t have active directory deployed please referrer to installing active directory.
After installing active directory follow the following steps.
1. Add the following connection string under </configSections> tag.
The above connection string is pointing to our active directory and its name is ADConnectionString.
NOTE: if connection element right under the <configuration> tag following exception will occur
Parser Error Message: Only one <configSections> element allowed per config file and if present must be the first child of the root <configuration> element.
2. Now add following membership provider under <system.web> tag.
In the above membership provider we mentioned defaultProvider as we can use more the one providers.
In the type we mentioned that we are going to use active directory membership provider by specifying ActiveDirectoryMembershipProvider assembly information.
Note that in the connectionStringName I have use the same name I mentioned while creating connection string.
In the connectionUsername and connectionPassword I am specifying that this is the service account I am going to use while connecting to the active directory.
NOTE: in this example I have use techerz.com as domain name, you need to ‘techerz.com’ with your domain name. If you don’t know the domain name just ping the computer on which active directory is deployed.
Ping <computer name>
It’ll return fully codified domain name like [computer name].[domain name].com. use only [domain name].com
3. Add a new web form and name it Destination.aspx
4. Now add the following markup on in the landing page of your website.
After you press Ok, windows will start installing binaries, this may take some time
2. When windows finished installing binaries. you would see a window like this, Click on Next
3. Click on Next
4. Put radio button on Create a new domain in a new forest, and than click on Next
5. Now select a domain name like corp.contoso.com, in my case it is taqi.com, than click Next
After this windows will check your network to make sure that there is no domain name which you have selected.
6. Now Windows will assign you a NetBIOS name, but you can change it to whatever you want. Click on Next
7. Now from the drop down menu select Windows server 2008 R2, and click on Next
8. Now put check mark on DNS Server, and than click on Next
9. Click on Yes
10. You can change the default folder for your Database, Log files and SYSVOL, to change a folder click on Browse. If you don't want to change the folder than click on Next
11. Now Choose a strong password, and click on Next
12. We are almost done, on this page you can verify all the settings, if you think there is something wrong than you may click on Back and can correct them. If every thing is OK, than click on Next
After you click Next, the wizard will start installing Active Directory.
(THIS CAN TAKE SOME MINUTES SO BE PATIENTS)
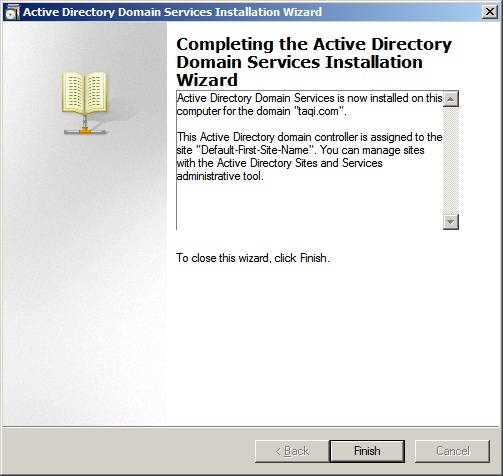
13. Upon successfully installation of Active directory you will see this window, click on Finish
14. You will be required to restart you windows, Save all your work and than click on Restart Now
Now You have successfully installed Active Directory
If you frequently use components in control panel, you might have noticed that every time in order to open an application you first have to open control panel than the application
Do you want a shorter way to access all these components, without open control panel ??
If so, than this post will be very useful for you. As today I am going to share some shortcuts.