ADO.NET
When creating applications that work with data, The Microsoft.NET framework provide a set of classes that aid in this process. The classes that you use for common data tasks such as communicating, storing, fetching and updating are all allocated in the System.Data namespace. These data access classes are collectively known as ADO.NET
There are a number of databases with which you can connect, and the type of classes that you use is dependent upon the database.
Creating a Database in SqlServer 2005 Express Edition:
Express edition is installed free of cost with visual studio 2005. This limited featured provides sufficient facility for creating and using database.
Following are the steps that should be followed in order to create an Sql Server database file
After clicking “OK” the “Data source configuration wizard” is appeared, click cancel.
In the solution explorer, the file of the database can be seen.
Double click the file to open it in server explorer.
In order to create a new table, right click the tables folder which will cause a pop-up menu to be displayed. Click the “Add New Table” button
How to create a Table: Creating a table store courses
This section explains how to create tables by taking a table of “courses” as an example. After clicking “Add New Table” in the server explorer following screen will be displayed
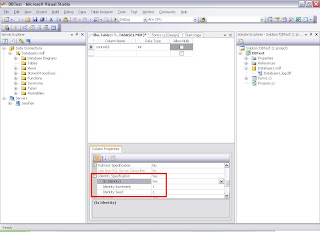
Following figure demonstrates the creation of a new column and setting it as Identity. Specifying a column as identity causes it to become an auto number column.
In order to specify a column as primary key, right click a column and select the option “set primary key”
Add another column with the name “coursename”.
After clicking the save button the “choose name” dialog box will be displayed. Type a name e.g. “courses” then press ok
In the solution explorer right click the name of table to display the menu. In the menu choose show table data.
Enter data in the table as shown in the following figure
Connection:
Before communicating with any database we need to connect with it. This purpose is fulfilled by the objects of connection class. The connection class only provides a pipeline or link, and it does not contain information about queries, neither it holds data.
When using the connection, the first step is to decide which connection class to use. The primary connection classes available are:
SqlConnection: For SqlServer2000 and SqlServer2005
OledbConnection: Oledb Datasources (MS-ACCESS)
Odbc Connection : Open Database Connectivity (ODBC)
OracleConnection: Oracle 7.3, 8i, 9i
ConnectionString:
Among many properties of the connection class one is the ConnectionString property. The connection string provides information such as the name of database and the location of database.
Following is the code that creates the connection object for an SqlServer Database file.
Note: the connection string can be obtain from the properties window after clicking the database in solution explorer
Command:
The objects of Command class hold the query as per which the data is to be retrieved. In addition the command object also stores a connection object representing the database to which the query has to be sent.
Like Connection class, there are multiple versions of the Command class for individual databases.
DataReader
The DataReader object enables a client to retrieve a read-only, forward-only stream of data from a data source. Results are returned as the query executes and are stored in the network buffer on the client until you request them using the Read method of the DataReader class.
Following code shows a sample code to demonstrate Connection, Command and DataReader
Managing the data file:
By default, when you build a project, the database file is copied from the root project folder into the output (bin) folder (select Show All Files in Solution Explorer to view the bin folder). This behavior is due to the Copy to Output Directory property of the file. The default setting of the Copy to Output Directory property is Copy always. This means that the database in the bin folder will be copied every time you build, debug, or run your application (that is, copied from the root project folder to the output directory).
The relationship between the two versions of your database file is dependent on the setting of the Copy to Output Directory property, which is described in the table below.
During application development, any changes made to the data (during run time within your application) are being made to the database in the bin folder. For example, when you press F5 to debug your application, you are connected to the database in the bin folder.
| Copy to Output Directory setting | Behavior | ||
| Copy if newer | This option is not recommended. The database file is copied from the project directory to the bin directory the first time the project is built. Every subsequent time you build the project, the Date Modified property of the files is compared. If the file in the project folder is newer, it is copied to the bin folder, replacing the file currently there. If the file in the bin folder is newer, then no files are copied. This setting persists any changes made to the data during run time, meaning every time you run your application and save changes to the data, those changes are visible the next time you run your application.
| ||
| Copy always (default) | The database file is copied from the project directory to the bin directory every time you build your application. Every time you build your application and save changes to the data, those changes are overwritten when the original file is copied to the bin directory, replacing the copy that you just changed. You do not see the updated data the next time you run your application. Any changes made to the data file in the output folder will be overwritten the next time you run the application. | ||
| Do not copy | The file is never copied or overwritten by the project system. Because your application creates a dynamic connection string that points to the database file in the output directory, this setting only works for local database files when you manually copy the file yourself. You must manually copy the file to the output directory after setting to Do not copy. |
Working with data in Disconnected environment:
ADO.NET provides several objects, such as DataSet and DataTable objects, for caching data in applications so that one can disconnect from the database and work with the data in application and then reconnect when you are ready to save updates back to the data source.
Displaying data on the form using disconnected environment:
In order to display the data in the form of grid, click on the menu Data -> Show Data Sources. This will display the following window
Drag and drop the table that you want on the form. This will result in the modification of interface by the addition of navigation bar for navigating records and a DataGridView.
DataAdapter
In order to get data from the database a DataAdapter is required. In Disconnected environment it is the responsibility of DataAdapter to bring the data from database into the dataset and to update the data in database as per the dataset. The adapter opens the connection only when it is required for example while getting data from database and updating the database.
Creating adapter:
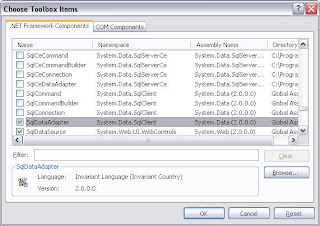
In order to create the adapter it should be first added to the toolbox. This can be done by right clicking the toolbox and clicking the menu item “choose items”
This will result in the following screen from which SqlDataAdapter should be checked. Once “OK” button is pressed, SqlDataAdapter can be seen on the toolbox.
Drag and drop the SqlDataAdapter from the toolbox on to the form, which will result in the execution of “Data Adapter Configuration wizard”.
The first window of the wizard allows one to choose the database from which the data is to be fetched.
Click “Next” after choosing the database. Screen that follows asks about whether to use procedure or “Sql Query”. Choose “Use Sql Statements” and then click “next”.
It will result in the “Generate Sql Statement” screen being displayed. Click on the Query Builder to open the following screen will be displayed
Choose the table from which you want to get data and press “Add” button. As a result of this the following screen is displayed. Choose the columns that you want to include and a query will be automatically generated.
Clicking “OK” button will transfer the control back to the “Generate SQL Statements screen”, click “Next” to display the final screen i.e. “Wizard Results”. This screen informs whether, Insert, Update and Delete queries have been successfully generated or not. Click finish to transfer the control back to the “form designer”.
After performing the above steps, an instance of SqlDataAdapter named as SqlDataAdapter1 will be available on the form. The final step is to call “Fill” method in order to populate data in the DataSet.
In addition on click event of the “Save” button in the BindingNavigator, “Update” method of the adapter will be called. Following is the code for both


No comments:
Post a Comment